| TOE - Transverse views |
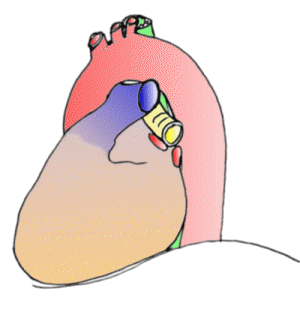
Basic AnatomyThe above picture gives a good idea of the basic anatomy of the heart and surrounding structures. (The heart is seen from the left, with posterior structures on your right as you view the image). See how the probe passes in the oesophagus (green) posterior to the heart. For reasons of clarity, the stomach (where the head of the probe is sitting in the above picture) is not shown. The pulmonary artery trunk and left pulmonary artery are shown in blue, with the left pulmonary artery cut off near its root. The left main bronchus (yellow) is seen passing behind the pulmonary artery. Move inferiorly and anteriorly and you see the left atrial appendage; posterior to this (in red) are the superior and inferior pulmonary veins, cut off where they drain into the left atrium.We will refer to the above picture again and again as we view the heart using TOE. Note that in the picture the "fan" of ultrasound is cutting the heart obliquely, and not at 90o to the long axis of the heart. This is a common problem, and if not corrected it will give you misleading information about ventricular contractility and wall motion. Beware! A few practical tips (Thanks to Dr Olaf Larson for highlighting these!):
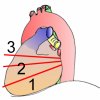
Note that, by convention, the TEE image is displayed with the probe positioned at the top of the screen, and structures on the patient's right are shown on the "screen's right" - your left, as you watch the screen, just as with viewing a normal chest x-ray. {In contrast, the Mayo Clinic has its own peculiarly logical way of doing things}. This is in the "transverse plane", which is conventionally labelled as "0 degrees". If we rotate the plane of scanning "forward" to 90o, then we will progressively see structures that are more inferiorly located, and these will creep in on the left of the screen. Further rotation forward to 180o results in a mirror image of the picture seen at zero degrees. Different strokes..In the following we systematically review transverse and horizontal images acquired at different levels. When you actually perform a TEE, there's no good reason why you have to stick to the sequence we've followed. Some prefer to move from distal to proximal, others start proximally! As long as you're systematic, and thoroughly document you're findings, the choice is yours!Transverse ImagesThere are three principal levels at which an echocardiographer should view the heart in transverse view ("short axis"). These are:
Some authorities lump the last two together as 'Mid-oesophageal', and also talk about 'upper oesophageal' (UE) views when looking at the aorta. At each of these levels, different views can be obtained by manipulating the probe - the controls of the "gastroscope" can be used to flex or extend the tip, allowing various views to be obtained. (Further 'fine-tuning' can be achieved by gently rotating the scope, or advancing or withdrawing it). This document contains representative views at the three levels. Note that one should not have a pseudo-religious fixation about 'levels' and 'planes', especially with the advent of multiplane TOE - rather tailor the examination to allow adequate examination of all structures. Our "three levels" are merely a guideline! PitfallsNote that there are numerous pitfalls in interpreting the TOE, especially if views are only obtained in one (transverse) plane. Apart from technical matters (such as incorrectly setting the gain controls so that LA spontaneous contrast is either missed or over-diagnosed) - it is easy to misassess the tricuspid valve, and, particularly, the pulmonary valve if transverse plane views are relied upon. Similarly, it may be difficult to properly assess all cusps of the aortic valve in one plane, and a cusp may incorrectly be interpreted as a mass or vegetation. Lambdl's excrescences may also be misdiagnosed as 'vegetations', but they are on the cusp midpoints and the valve should be otherwise normal.Note that over or under diagnosis of spontaneous contrast can be compensated for by setting the gain to fairly high contrast, comparing with the pulmonary veins which very infrequently show spontaneous contrast, and noting the swirls which are invariably present with true spontaneous contrast. For assessment of stenotic lesions, conventional TEE studies are
often inadequate, and CW doppler is required, although even this
may underestimate the lesions if improperly used.
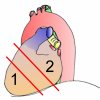
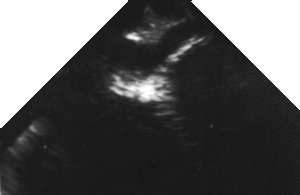
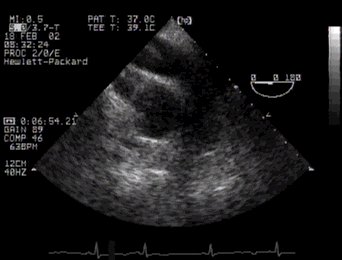
The transgastric short axis views are mainly used for assessment of left ventricular function and myocardial ischaemia. The most useful view in this regard is the LV short axis view at the level of the papillary muscles. PitfallsIt is easy to obtain views not perpendicular to the heart's long axis. (So that for example the body of the anterolateral papillary muscle is visualised together with the chordae of the posteromedial papillary muscle). This can compromise assessment of regional wall motion, especially the septum.If the left atrium and/or right ventricle are markedly enlarged, displacement of the left ventricle may prevent adequate visualisation of the short axis LV. During intra-operative assessment, lighting is often excessive, compromising visualisation, small bubbles are common and should not be mis-diagnosed as spontaneous contrast, probe manipulation may be difficult, and electrocautery may interfere with the functioning of the echo machine. Adequate ECG lead placement is vital. The probe should be switched off when not in use, as otherwise overheating (and consequent cut-out) is common - some even irrigate the oesophagus with iced saline!
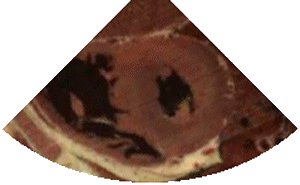
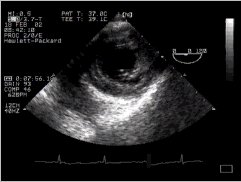
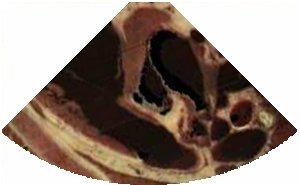
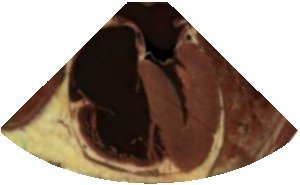
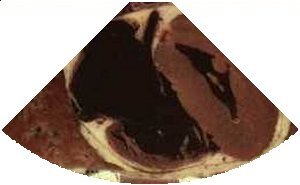
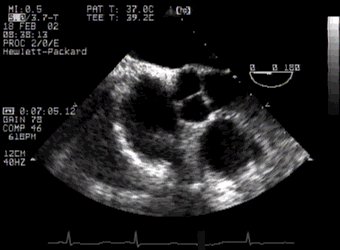
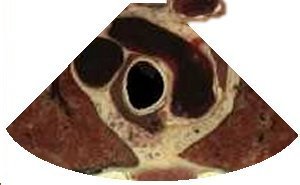
The following pictures show (on the right) an echocardiographic image
of the LV short axis, and on the left, an anatomical image taken from
the visible human project. If you move your mouse over the left image,
then the picture should change to a labelled one, with the right (RV)
and left (LV) ventricular cavities clearly visible, the interventricular
septum (ivs) between, them, and the strangely named inferior, posterior,
and anterior walls of the left ventricle shown (iw, pw and aw respectively)
together with their blood supply. The territory supplied by the left
anterior descending coronary artery is shown in green, that supplied
by the circumflex in red, and the right coronary artery territory in
blue.
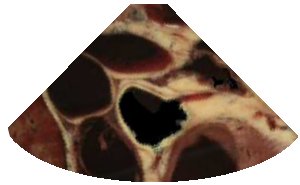
The papillary muscles are also labelled (pm = posteromedial, al = anterolateral). (If anything, the anatomical section is a bit too close to the mitral valve, and the papillary muscles are thus smaller in cross section - we've taken this section because in sections nearer the apex, the left ventricular cavity is minuscule). In addition, the left ventricle in the visible human is very poorly filled, so the wall appears thickened, and the cavity diminished. Note that coronary anatomy varies considerably from individual to individual, so the above supply doesn't necessarily apply to everyone. Use the information contained in an angiogram of the patient, if you have this! Obtaining the viewsAs the probe tip passes through the gastro-oesophageal junction, there may be some patient discomfort. Reassure them, then anteflex the probe to keep mucosal contact. The depth of field needs to be increased to adequately view all structures.
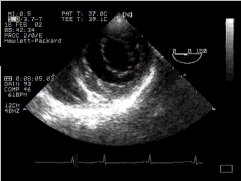
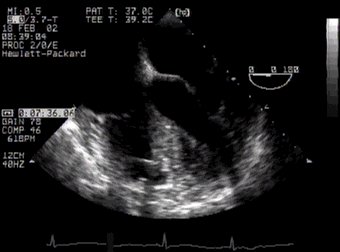
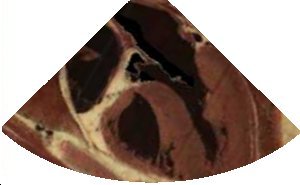
Again, move your mouse cursor over the left image to reveal the labels. The anterior leaflet of the mitral valve (aml) is clearly seen between the left ventricular outflow tract (lvot) and the mitral valve orifice (mvo). B. Mid-oesophageal views
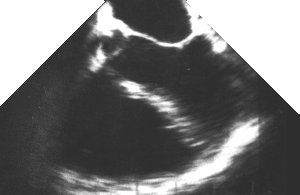
The mid-oesophageal views have a variety of uses, and are good for assessing the atria, ventricular septum, ventricles, the "internal crux" of the heart, and both AV valves and their supporting structures. The LVOT is particularly well seen in the apical five-chamber view, especially in assessing "septal hypertrophy" and hypertrophic cardiomyopathy. (Colour flow doppler of the LVOT is useful in assessing aortic regurgitation, and also mitral flow; steerable CW is great for the jets of MS and MR, as well as AS and AR). PitfallsThe true apex may be missed (together with contained thrombus), especially with marked left atrial enlargement.Prosthetic valves may obscure visualisation of the ventricles.
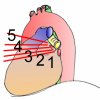
In the picture from the visible human slice server on the left, note how dilated the right side of the heart is, with the left side extremely poorly filled (This isn't normal). You can still however still see all four chambers clearly, with the interatrial septum bulging into the left atrium! Three of the chambers are labelled (RA, LA, RV) - but the left ventricle is also clearly identifiable. You can also clearly delineate the mitral valve (mv), tricuspid (tv) and lateral wall of the left ventricle (lw). In the echo image, you can actually also see the start of the LV outflow tract, so technically this is a 'five-chamber' view (see below). Obtaining the viewThis view is usually obtained with the probe 35-37 cm from the incisor teeth. Note that good views of the mitral valve are obtained, and the interatrial septum is also well seen, but the apex of the left ventricle is usually not well seen, precluding assessment of ventricular function.
In the misleadingly named "five-chamber view" (the fifth chamber is the LV outflow tract) all four chambers can again be seen, but so too can the aortic valve (av) and the left ventricular outflow tract (lvot), separated as usual from the left atrium by the anterior leaflet of the mitral valve.
In these views, the coronary sinus (cs) is clearly visible, and the inferior vena cava (ivc) can just be seen starting to appear, draining into the right atrium (RA). Note that the coronary sinus runs in a groove between the left ventricle and left atrium, so that if these chambers are well filled (which is not the case in the visible human) then the left atrium may also be visible. (The LA would also be better seen from a vantage point slightly higher up the oesophagus, with the probe beam directed inferiorly and anteriorly, rather than the nearly horizontal cuts shown here). The echo image is greatly enlarged compared with the anatomical one, and in a somewhat different plane! The 'standard' ASE view incorporates the RV outflow, which is not seen in our image.
In the following image, the RV inflow and outflow can be seen, with a pulmonary artery catheter transgressing both! C. Basal views
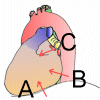
Basal short axis views are good for assessing the anatomy of a variety of structures, including the Aortic Valve, coronary arteries, left atrial appendage, RVOT, SVC, upper pulmonary veins, and pulmonary arteries. (Colour flow Dopper is often a useful adjunct).
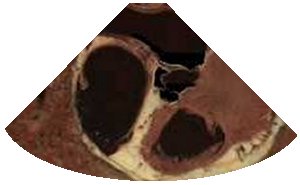
The following view is really rather important, mainly because it contains
an unmistakable landmark - the 'Mercedes-Benz sign'of the aortic valve in cross section (av). Posterior to
this valve (and close to the probe) you can see the left atrium, to the
patient's right (your left) is the right atrium, and ventrally is the
right ventricular outflow tract.
Note that the anatomical section is slightly off-true, so the sign is skewed - a useful tip! Note that in this fairly cephalad view, the interatrial septum is thick - more inferiorly it thins markedly. The right ventricular outflow tract is also well seen (rvot).
The left atrial appendage (laa) is well seen in a range of transverse anatomical sections through the visible human - we've chosen one where it's particularly well delineated, but it can even be visualised in the previous (coronary artery) images - can you spot it? Note in our anatomical image the bulky area where the left superior pulmonary vein (lspv) meets the left atrium - to the uninitiated, this can look like thrombus in the left atrium!
We have not illustrated this view, as it is very similar to
the following.
These views are of the main pulmonary artery at the level of its bifurcation. See how the origin of the right pulmonary artery is visible (rpa), but note the position of the left main bronchus (lmb) in the image - even if you move cephalad and rotate the probe, to try and visualise the left pulmonary artery, it will be obscured by this bronchus!
[When we have adequate images of these, we'll insert them here!]
The left superior pulmonary vein is fairly well seen in the left atrial appendage view above. Obtaining the ImagesThe above basal views are usually obtained at ~ 25 to 30 cm from the incisor teeth. Gentle anterior flexion of the probe will improve visualisation. | |||||||||||||||||||||||||||||||


| < Previous | ^ Home | Next > |